New project: '03 Maycraft 1800

Classic Parker Boat Forum

Help Support Classic Parker Boat Forum:

This site may earn a commission from merchant affiliate links, including eBay, Amazon, and others.
Got close this weekend...but not close enough. Rain and a sticky caliper on my Jeep took some much needed time away from boat work. I did however manage to get a bunch of stuff knocked off my list...

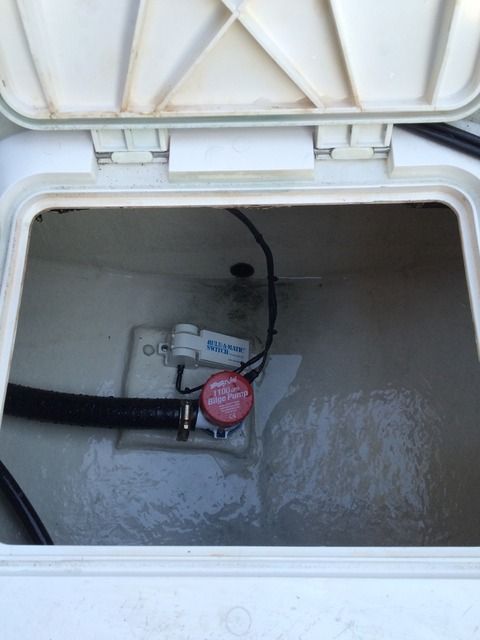
1. Bilge pump and float switch replaced, thru hull reinstalled. The manual switch on the console is flaky so that will need to be replaced in the future.
2. Anchor/Navigation light switch replaced.
3. Got most of the gunk cleaned out of the well that holds the battery and remounted the battery box.
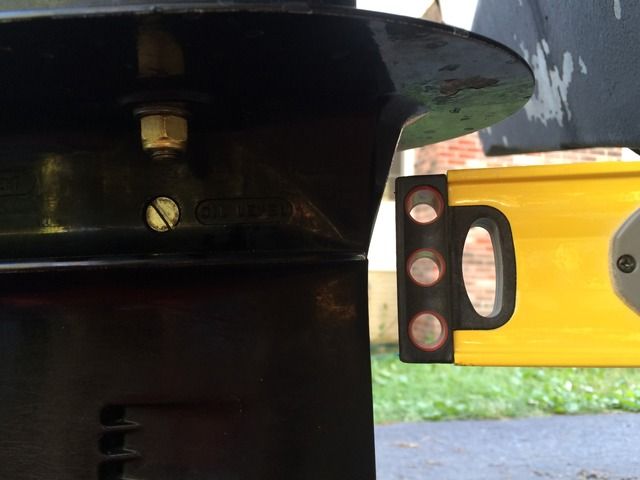
4. Cleaned and regreased most of the electric connections under the cowling.
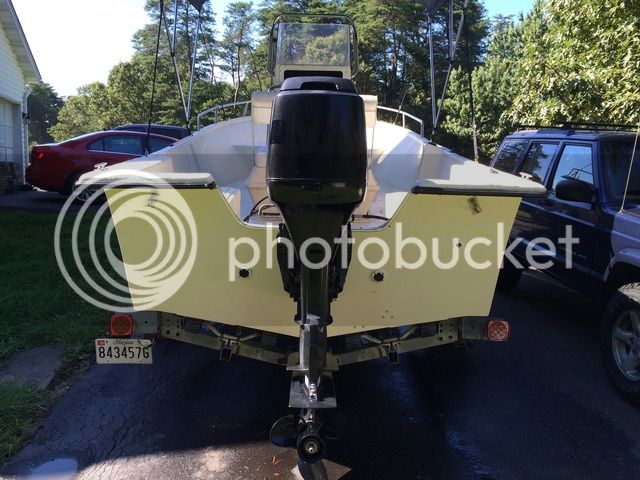
5. Cleaned, waxed and reinstalled the lower cowlings.
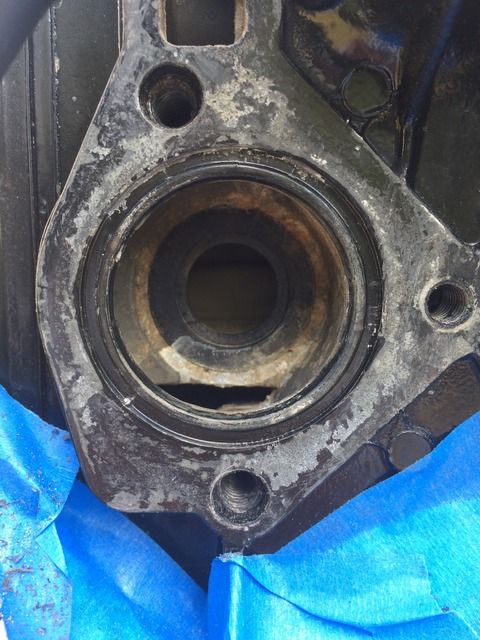
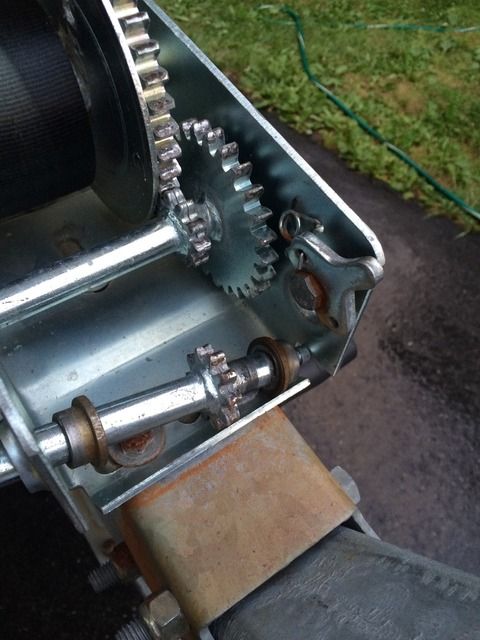
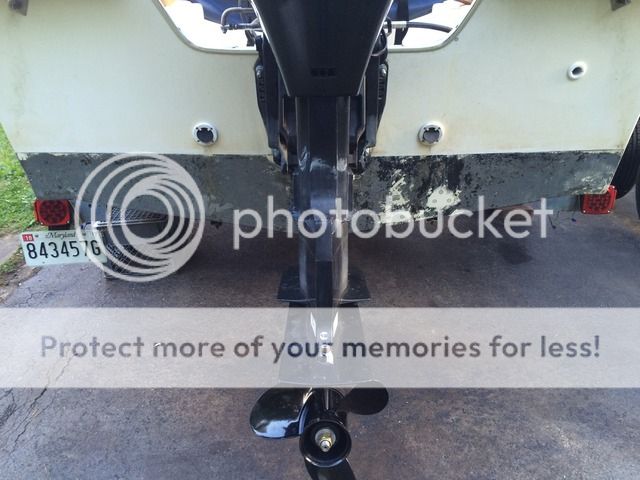
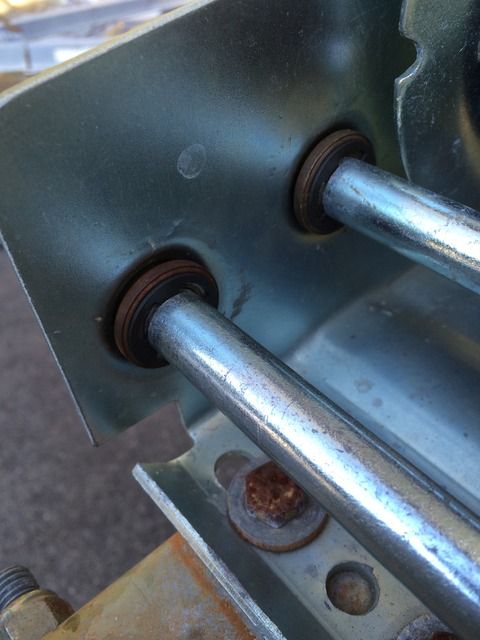
6. Finished up the water pump replacement and remounted the lower unit. New base came with the seals already installed so it went together very easily.

IMG_1693_zpsbjplgyry.jpg


IMG_1694_zpsgbmhtqac.jpg


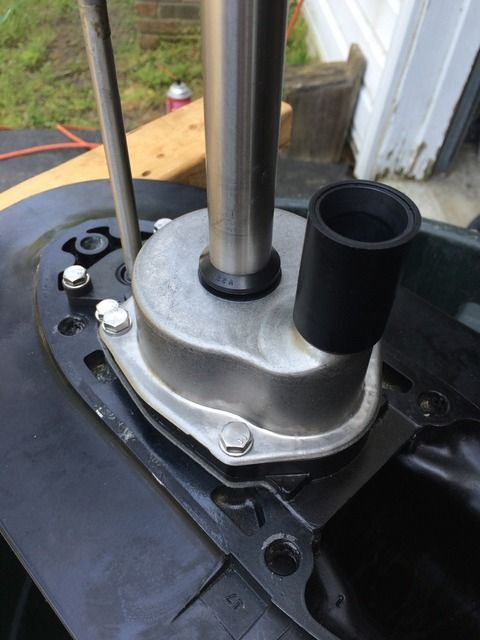
There was a lot of salt built up in two of the holes that the bolts for the 5" housing extension run through. I dug out what I could but will probably drop the lower again in the off season and pull the extension to clean the holes thoroughly.

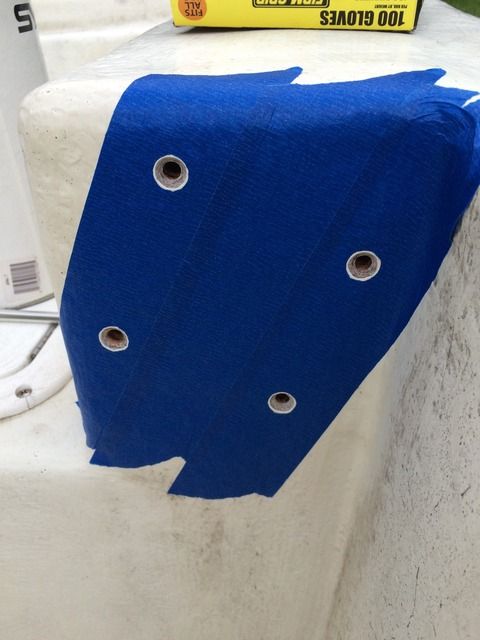
7. Made a temporary repair to the trailer rash on the keel. I built it up with thickened epoxy. When I have more time I'll grind that down and do it properly. For now I just wanted to the exposed glass sealed up. It was a PITA trying to shape the area before I had the idea to put the tape on.

IMG_1703_zpssx22x6no.jpg


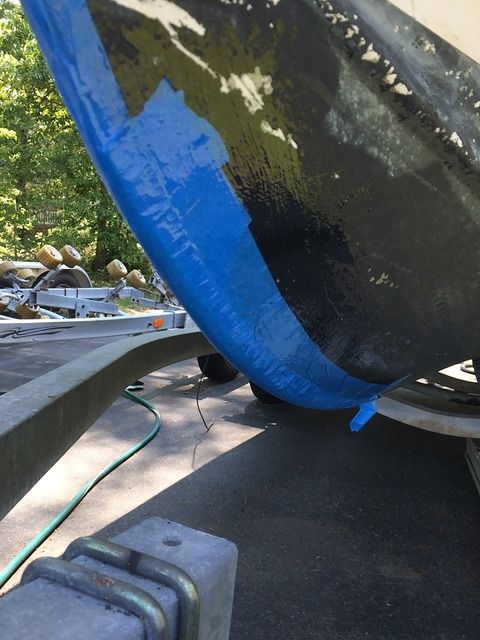
Tried to pull the tape and it's really stuck on there. :cry:


Just some little things left before I can do the first splash.

1. Reinstall the nut on the back side of the bilge pump thru hull.
2. Clean and reinstall the bilge pump hose.
3. Stick my new prop on.
4. Put the registration numbers on.
5. Clean and reinstall the top cowling seals.
6. Wax the cowling.
7. Give it another bath (if I have time).
8. Finish the brakes on my Jeep...
 
I wouldn't worry about the tape.
It will grind off when the time comes. :wink:

Nice work.
 
A few minor updates to report...

The last time I was under the cowling I noticed a part of the shifting mechanism was cracked. So I replaced that and adjust the cables. Tossed a quick coat of wax on the cowling and I think that just made it look worse as it revealed all the cracks in the paint on the top. :? Oh well, that can be addressed another day. Sucked the crap multipurpose oil out of the reservoir, refilled with Pennzoil Premium Plus and put the cowling back in place.

Engine, battery and boat harnesses bundled up in the aft battery box.

IMG_1761_zpsbqcyuurl.jpg


Finished cleaning the bilge (not Megabyte clean though) and reinstalled the bilge pump discharge hose. I don't like how this routes out through the transom and if/when I cut out those aft boxes, I will patch up the transom hole and drill a new one in the hull side.

IMG_1762_zpshxt59rra.jpg


I had already ordered the parts to replace the thermostat and service the poppet valve. I didn't necessarily want to get into that before going on a shakedown cruise (laziness), but I did it anyway. After pulling the cover off the inside of the block was much cleaner than I was expecting. Whomever serviced the engine last looks to have put some adhesive on the cover gasket so it took me a while to get that all cleaned up. I debated doing the same, but chose to install the gasket dry since my service manual makes no mention of adhesive.

IMG_1765_zpstfzc64fs.jpg


The battery that came in the boat was 8 years old. So I dug the one out that came with the last Grady I owned (it is only 6...lol), topped the water off in it, charged it up and stuck it in the boat.


...and now the major update. I hitched the trailer to the truck and decided to take a little drive with the kids. :)

IMG_1768_zpssxwe07u6.jpg


Stopped for a new water separator, some fresh gas (w/ Stabil and Ringfree) and then got the bottom wet.

IMG_1770_zpsflgvbxpv.jpg


The little Merc fired right up and pumped a strong stream of cooling water. There was absolutely zero smoke though, so that has me a little concerned. I did check the oil level after I got back and it had dropped. I think I'm OK, but I will probably do a flow test of the oil pump. Anyway, we ran it around for about 45 minutes. Pulled the cowling and saw no leaks from the thermostat/poppet cover. The tach reading was off and the fuel gauge didn't work at all. So, there are some things to troubleshoot, but nothing major. This week I need to drain the gear lube to check for water since I was messing with driveshaft seals.

Overall, I'm pretty happy with her. She rides like a much bigger boat, but it's a very wet ride. There was a strong wind all afternoon and it created a good chop on the river. The boat never pounded once, but I didn't push it hard either. She desperately needs trim tabs though.

Going on vacation this Saturday so it will probably be another 2 weeks or so before I can run her again.
 
Good for you!
Finally a boat that isn't cut apart and sitting in the driveway. :D
 
I also had this happen on Sunday...

IMG_1782_zpsyy568udl.jpg


While loading her back on to the trailer, I heard a loud bang, the winch handle started spinning freely and boat rolled uncontrollably off the trailer and back into the water. Stripped the entire strap off the winch. Had to make a grab for the strap before the boat floated away... The snap ring holding that shaft in place popped off (how that happens I have no idea) and the shaft walked out of the bore and free of the anti-reverse latch. Couldn't find the snap ring. I stuck the shaft back in place, but it wouldn't stay put and I ended up cranking the boat back up while maintaining a VERY tight grip on the handle. Once up I clipped on the safety chain. Going to check the hardware store for a replacement snap right (and a few spares) later today.


Started scraping bottom paint yesterday. Took about 10 minutes to get 98% of it off the transom. I think the primer is going to be a little more difficult to remove.

IMG_1795_zpsywjjklsb.jpg
 
That winch doesn't look that old. :shock:
Bad design or just bad luck?
Good thing you had a strap rather than a cable.

You going to try and make her a slick bottom?
How about re-painting the bottom in white sailboat hard paint rather than ablative?
 
Hoping to get back to gelcoat on the bottom. There's quite a few spots where the paint has completely flaked off and the gelcoat appears to have never been sanded. So I don't think it should be too difficult.
 
Haven't run the boat in a couple weeks, but I did finish up some fixes on the trailer.

Got the winch straightened out with two new e-rings from the local hardware store. After snapping those on and lubing the safety latch, it's nice and smooth now.

IMG_1798_zpsaxkbwltt.jpg


There there was this...

IMG_1767_zpswpcnznl4.jpg


I guess when the previous owner replaced the coupler, he never fully tightened down the bolts and over time the front mounting holes became wallowed out. This allowed up/down movement in the couple that I could feel when towing.

IMG_1903_zpsrpnwcny9.jpg


No problem. I chopped off about 5" of the tongue and redrilled the forward coupling bolt holes and bolt holes for the v-support under the tongue. There was an existing hole that I used for the rear bolt. Sprayed some cold galvanize over the bare metal. That stuff is crap. It flakes right off. Rustoleum primer would probably be better.

IMG_1913_zpsrwdpbc5e.jpg


I also drilled a new set of holes at the bottom of the tongue so I could mount proper safety chains. Previously the trailer had a set of rusty plastic encased cables that were bolted on in between the tongue and the v-support. I'll probably get new hardware as those bolts have been on an off a few times now and I want to have confidence that things are 100%.

IMG_1934_zpszrprekq9.jpg
 
Got all of the bottom paint and primer off of the transom. What a pain in the ass...

The paint itself came off easily a few weeks ago. Took me about 10 minutes with a simple scraper. The primer was a different story. There were/are spots on the hull where the paint and primer has completely flaked off and it looked like no sanding had ever been done. So I was thinking this was going to be a quick easy process. Nope. Turns out the hull has been sanded in spots and the primer is for the most part bonded really well. :(

I was hoping to get lucky with a $1.00 can of oven cleaner. I've read other people report that this takes off paint and I was hoping it would do the same for the primer. Sprayed it all over the primer on the transom and let it sit for about 15 minutes. Hit it with a scraper after that and found out that the primer hadn't been softened at all. Damn.

Maybe I'm a glutton for punishment, but I decided to get the job done with scrapers and sandpaper. Several hours, a sore shoulder and many pieces of 220, 320, 400, 600 and 1500 later, I emerged victorious. Even with stopping at 1500, the area below the waterline on the transom has a better shine than the rest of the hull. It will look great once I compound, polish and wax it.

IMG_2103_zps9j780siz.jpg


There was one spot I couldn't get out. You can kind of see it under the stbd side scupper. It looked like someone tipped the sander up on it's edge and dug in a bit. I didn't want to risk sanding too much and exposing laminate so I just left it for now. I'll address that spot when I get the gelcoat out and finish patching up the old transducer holes.

Gave the hull a quick bath after sanding since I'm pretty sure it hadn't been cleaned in years. Looks much better, but it's not as shiny as it appears in this pic.

IMG_2102_zps6pciekdq.jpg
 
excellent project: love the consistent progress. Your transom looks sweet. Nice job on the sanding/ wet sanding/ polishing to make it look 100 X better! Kids probably love that little hull
 
Work continues...

Started filling in the 20 screw holes that were left over from the 5 cheap, plastic rod holders that I pulled off. Drilled them out slightly and then put a nice countersink on each. Cut some 1/4" dowels to push into each and protected the surrounding areas with tape. Gave each hole and dowel a good coating of epoxy before pushing the dowels into place. Then I topped off each with thickened epoxy and ground them flush the next day. Ended up with a huge bubble in one so I'll do that one over then next time I get the resin out.

Doing this is a PITA but it makes clean up much easier. Tape over each hole and then cut out with an Xacto...

IMG_2112_zpsomby08nb.jpg


Dropped the boat off earlier today to a local mechanic to have the carbs gone over and the idle speed set. She idles too fast and I wanted to make sure everything was adjusted properly instead of me just turned a screw to bring the revs down.
 
Traded in my Tacoma on a Camry for the wife and my Jeep is down with bad front axle u-joints, so the boat is pretty much stuck in the driveway right now. Given that I figured it was a good time to tear down the hubs on the trailer for inspection/maintenance. Both sides ran cool down the highway, but I was definitely on borrowed time. One side was pretty noisy and I'm not sure how much life the hubs themselves had left in them. Huge amounts on rust scale on both hubs and I was able to pick off most of what what left of the brake flanges with my fingers.

IMG_2315_zpsqgbmu8k6.jpg


Looks like a bearing seized on this spindle once before...

IMG_2318_zpspzx3r8rh.jpg


Pretty sure a new seal wouldn't last long here...

IMG_2319_zpsbv0gbkyl.jpg


Then there's the tires...

IMG_2314_zpsogs07elx.jpg


Guess I'll do a comparison between the cost of all the parts needed to repair this one and the cost of a new trailer.
 
Can you get a complete new axle and brake assembly from Eastern Marine?
Did those tires hold air? :shock:
 
I was hoping I could get away with some speedy sleeves, new hubs, bearings and tires, but since I am hoping to take the boat to NC next summer, I think that would be pushing my luck. There is significant rust on the axle tube where the brake flanges use to be and the last thing I want is to snap off a spindle while cruising down 95. The rims have some rust on the back sides where they meets the hubs too. Not sure if I'm going to replace them yet or not, but I probably will. As far as brakes go, I don't think the trailer has ever had them and that how I want to keep it if I can.

Load Rite's customer service dept told me the trailer was originally built with a torsion axle as opposed to the leaf spring axle that's on it now. However, there's no evidence on the trailer itself that that was the case.

The recommended torsion axle /w hubs + springs + rims/tires + misc nuts and bolts is over $900 from Eastern Marine. Direct replacement w/ hubs + springs + rims/tires + misc nuts and bolts is pushing $700. Neither of those seem like cost effective options to me... :(
 
Back
Top