This is going to be a fairly lengthy post. I will add additional posts describing my installation.
Last Spring I took my adult son and a buddy rock fishing in my 2007 2120SC. Seas were a little square on the way out and we took some pretty hard hits. I didn’t think it was all that bad sitting on top of my Seaspension pedestal, but my son gave me quite the earful. I decided to look into options to smooth out the ride for the crew after that trip.
I was initially going to replace the bench with a single forward facing seat on a pedestal and cut it down to a stubby bench behind the new seat, but the wife did not want to give up the option of having three on the bench as we often go out with another couple.
I looked at a bunch of options including Garelick and Springfield spring loaded mounts, tractor seat suspensions, Smooth Move mounts, SeaSpension pedestals, and Pro Pedestal pedestals. Part of the challenge here is that you have to allow the bench to move up and down to cushion the blows. If you are going to leave the cabinet in place under the seat then you have to raise the seat bottom above the cabinet to allow that travel. In the end I decided that a pair of pedestals under the bench was the way to go. SeaSpension bench pedestals are pretty spendy and I decided to give the Pro Pedestals a try.
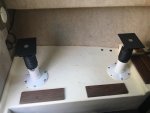
My initial plan was to install the pedestals hidden inside the bench cabinet. There were several problems with that. The PP is purported to have 5” of travel. If I wanted to have full travel then the seat bottom would have to be raised 5” above the cabinet, this is not really a practical height and would look goofy as heck if it was. Another problem is that the pedestals would have eaten up most of the usable space inside the cabinet. I decided to remove the cabinet entirely and install the bench on the two pedestals. I’m really pleased with the end result, as this freed up a ton of space under the bench that is way more useful than the cabinet ever was. I throw toolbox, weight bags, tackle boxes, backpacks, etc. under the bench and everything is easily accessible.
I spent quite a bit of back and forth with Pro Pedestal working out the height details before ordering. I wanted the bench to sit just a bit higher than it is on the cabinet because it will sag under the initial weight of the passengers. I ended up with 15” pedestals, plus the height of the adapters that go between the seat and the pedestal.
The Parker bench seat bottom is intended to be supported by the cabinet underneath. It would collapse in the center if only supported by the two pedestals at the end. I addressed this by adding a piece of ¾” plywood under the seat, which adds to the overall stack height. You could also weld up a frame for the seat to rest on.
PP hadn’t done a lot of bench seat applications and we worked through a few issues after the initial sea trials to get the performance tuned. Greg, the owner of Pro Pedestal, was very helpful in working through the issues and we’ve got a good baseline if anyone else chooses to do this.
The two pedestals have to work somewhat independently. If you have one big guy sitting on the back end of the bench seat the rear pedestal will do most of the work, and the front pedestal will not see much travel. PP developed a compliant adapter that goes between the top of the pedestal and the seat bottom to allow this independent action, but it proved to be a bit too stiff. We added some vibration isolators to the stack and this resolved that issue.
The spring rate was initially too stiff for the dual pedestal application and we were not getting as much shock mitigation as expected. PP sent me replacement springs that really improved the ride. It’s kind of hard to target exactly the right spring rate when you consider that you might have anywhere from one lightweight to three big guys on the bench. The springs we ended up with strike a good balance, and seem to work pretty well under all loads.
When I did the install there was an annoying amount of rocking of the bench. It turns out that the pedestals have a noticeable front to back play in one direction and are more stiff in the other orientation based on a keying feature. I drilled new holes in the adapters that allowed me to rotate the pedestals 60 degrees in the base mounting holes. This puts the keying feature on the pedestals “kneed in” toward one another and resolved the rocking.
I spent time ahead of the installation to fabricate and glass the plywood base and prepare backing rings to go under the deck, then spent about a full day to do the installation. I would say that this is by far the best upgrade that I have done since getting the boat. The crew is still sitting sideways on the bench, which is never going to be as comfortable as facing forward, but the pedestals take the shock out of the hard hits and make for a much happier crew. It was an unexpected bonus to gain the extra space under the bench.
Last Spring I took my adult son and a buddy rock fishing in my 2007 2120SC. Seas were a little square on the way out and we took some pretty hard hits. I didn’t think it was all that bad sitting on top of my Seaspension pedestal, but my son gave me quite the earful. I decided to look into options to smooth out the ride for the crew after that trip.
I was initially going to replace the bench with a single forward facing seat on a pedestal and cut it down to a stubby bench behind the new seat, but the wife did not want to give up the option of having three on the bench as we often go out with another couple.
I looked at a bunch of options including Garelick and Springfield spring loaded mounts, tractor seat suspensions, Smooth Move mounts, SeaSpension pedestals, and Pro Pedestal pedestals. Part of the challenge here is that you have to allow the bench to move up and down to cushion the blows. If you are going to leave the cabinet in place under the seat then you have to raise the seat bottom above the cabinet to allow that travel. In the end I decided that a pair of pedestals under the bench was the way to go. SeaSpension bench pedestals are pretty spendy and I decided to give the Pro Pedestals a try.
My initial plan was to install the pedestals hidden inside the bench cabinet. There were several problems with that. The PP is purported to have 5” of travel. If I wanted to have full travel then the seat bottom would have to be raised 5” above the cabinet, this is not really a practical height and would look goofy as heck if it was. Another problem is that the pedestals would have eaten up most of the usable space inside the cabinet. I decided to remove the cabinet entirely and install the bench on the two pedestals. I’m really pleased with the end result, as this freed up a ton of space under the bench that is way more useful than the cabinet ever was. I throw toolbox, weight bags, tackle boxes, backpacks, etc. under the bench and everything is easily accessible.
I spent quite a bit of back and forth with Pro Pedestal working out the height details before ordering. I wanted the bench to sit just a bit higher than it is on the cabinet because it will sag under the initial weight of the passengers. I ended up with 15” pedestals, plus the height of the adapters that go between the seat and the pedestal.
The Parker bench seat bottom is intended to be supported by the cabinet underneath. It would collapse in the center if only supported by the two pedestals at the end. I addressed this by adding a piece of ¾” plywood under the seat, which adds to the overall stack height. You could also weld up a frame for the seat to rest on.
PP hadn’t done a lot of bench seat applications and we worked through a few issues after the initial sea trials to get the performance tuned. Greg, the owner of Pro Pedestal, was very helpful in working through the issues and we’ve got a good baseline if anyone else chooses to do this.
The two pedestals have to work somewhat independently. If you have one big guy sitting on the back end of the bench seat the rear pedestal will do most of the work, and the front pedestal will not see much travel. PP developed a compliant adapter that goes between the top of the pedestal and the seat bottom to allow this independent action, but it proved to be a bit too stiff. We added some vibration isolators to the stack and this resolved that issue.
The spring rate was initially too stiff for the dual pedestal application and we were not getting as much shock mitigation as expected. PP sent me replacement springs that really improved the ride. It’s kind of hard to target exactly the right spring rate when you consider that you might have anywhere from one lightweight to three big guys on the bench. The springs we ended up with strike a good balance, and seem to work pretty well under all loads.
When I did the install there was an annoying amount of rocking of the bench. It turns out that the pedestals have a noticeable front to back play in one direction and are more stiff in the other orientation based on a keying feature. I drilled new holes in the adapters that allowed me to rotate the pedestals 60 degrees in the base mounting holes. This puts the keying feature on the pedestals “kneed in” toward one another and resolved the rocking.
I spent time ahead of the installation to fabricate and glass the plywood base and prepare backing rings to go under the deck, then spent about a full day to do the installation. I would say that this is by far the best upgrade that I have done since getting the boat. The crew is still sitting sideways on the bench, which is never going to be as comfortable as facing forward, but the pedestals take the shock out of the hard hits and make for a much happier crew. It was an unexpected bonus to gain the extra space under the bench.