Shannonigans
Well-known member
. .....since getting my 1999 2320 last year I believe have read every possible thing I can on this site. .. ...and I gotta say some of you have inspired me to try things I have never done. ....or probably wouldn't have attempted with past boats. The posts you guys put on here definitely help a novice like me.. ....and I found that the posts with photos were key!! I would like to post some pics I have taken along the way of some projects. They may be simple projects to some. ...and they may just help some one that needs a visual. .....
. ......now when I bought the boat I thought I knew what things to look for. . ....it was super clean and my mechanic gave the engine a go. ....the gentleman seemed to have kept up with things pretty well. . ...or so I thought! As the year went on last season I found a few things that needed to be fixed. .....all no big deal. The first thing I was going to fix I had done several times before. ....a simple bilge float switch. (I posted the internals of the switch after I tore it apart). . .....the problem was everything I touched that was associated with it. . ..broke!! The bilge pump wire insulation crumbled in my hands. ....the hose was so old it broke into pieces . ....but the thing that really got me. .. ....when I tried to get the hose off the thru hull for the washdown. .......the ENTIRE fitting moved!!
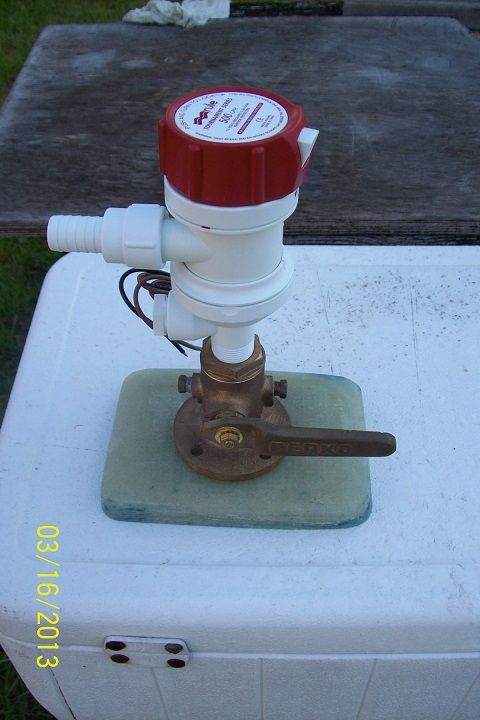
. ..... after doing a bunch of reading I found it was one of the worst ways you can install a thru hull/shut off valve. He came through the hull with a typical straight thru hull fitting. It was secured to the hull with some type of sealant and the lock nut. From there he put on a 90 degree fitting which then went to the shut off valve. . ...then another piece of pipe that the hose connected to. There's a few issues here. ....first was that the fitting and the pipe have different threads, so the pipe was only threaded in about 3-4 threads. . . ..not good. Second was the pressure that was put on the pipe from operating the valve was too much. From research I found this is where most failures took place. .....and they weren't pretty. Catastrophic failures with no way to stop the water. . .. . .unless you have a toilet bowl wax ring or two on the boat :wink:
This picture shows the thru hull fitting . . .disregard the mold and wire nuts. Neither are there anymore!
This is the fitting. ....the arrow shows where most breaks occur.
. .... .there is a website pbase.com that was extremely helpful when it came time to install the new set up. I used a seacock this time. .....and I went with a backing block I made from 3/4" IPE.... a Brazilian hardwood. They suggested using G10 or similar. ...some even used marine plywood like in the older boats. It came down to personal preference. ...... but after a conversation I had with a friend that owns a 59 year old wood boat. ..this backing block will outlast me. I drilled and tapped it for some bronze bolts I cut to secure the seacock to. The backing block was secured to the hull with a whole lotta 4200 and of course the thru hull itself.
Here is the dry fit to make sure it all fits. . ..I think the guy drilled the hole in the hull to close to the mounting for the bilge pump, but I got it to fit pretty good. .. . ...
The last picture is the installation all complete. .....I'm pretty happy with how it came out AND I believe it's much safer. .....
. ...the old pump was a West Marine wash down pump. . . .it was mounted in with the oil tank. I ditched that and went with the Rule Livewell pump instead. ....better for my application of keeping bait alive and still able to wet the deck to clean. ...I also used some 4200 to secure a Forespar (plastic) scoop to the hull. . ..but don't think I snapped a pic. ..
. .. . . ..so hope maybe someone can get something out of this. I will be posting a few more in the days to come.
Thanks for reading
. ......now when I bought the boat I thought I knew what things to look for. . ....it was super clean and my mechanic gave the engine a go. ....the gentleman seemed to have kept up with things pretty well. . ...or so I thought! As the year went on last season I found a few things that needed to be fixed. .....all no big deal. The first thing I was going to fix I had done several times before. ....a simple bilge float switch. (I posted the internals of the switch after I tore it apart). . .....the problem was everything I touched that was associated with it. . ..broke!! The bilge pump wire insulation crumbled in my hands. ....the hose was so old it broke into pieces . ....but the thing that really got me. .. ....when I tried to get the hose off the thru hull for the washdown. .......the ENTIRE fitting moved!!
. ..... after doing a bunch of reading I found it was one of the worst ways you can install a thru hull/shut off valve. He came through the hull with a typical straight thru hull fitting. It was secured to the hull with some type of sealant and the lock nut. From there he put on a 90 degree fitting which then went to the shut off valve. . ...then another piece of pipe that the hose connected to. There's a few issues here. ....first was that the fitting and the pipe have different threads, so the pipe was only threaded in about 3-4 threads. . . ..not good. Second was the pressure that was put on the pipe from operating the valve was too much. From research I found this is where most failures took place. .....and they weren't pretty. Catastrophic failures with no way to stop the water. . .. . .unless you have a toilet bowl wax ring or two on the boat :wink:
This picture shows the thru hull fitting . . .disregard the mold and wire nuts. Neither are there anymore!
This is the fitting. ....the arrow shows where most breaks occur.
. .... .there is a website pbase.com that was extremely helpful when it came time to install the new set up. I used a seacock this time. .....and I went with a backing block I made from 3/4" IPE.... a Brazilian hardwood. They suggested using G10 or similar. ...some even used marine plywood like in the older boats. It came down to personal preference. ...... but after a conversation I had with a friend that owns a 59 year old wood boat. ..this backing block will outlast me. I drilled and tapped it for some bronze bolts I cut to secure the seacock to. The backing block was secured to the hull with a whole lotta 4200 and of course the thru hull itself.
Here is the dry fit to make sure it all fits. . ..I think the guy drilled the hole in the hull to close to the mounting for the bilge pump, but I got it to fit pretty good. .. . ...
The last picture is the installation all complete. .....I'm pretty happy with how it came out AND I believe it's much safer. .....
. ...the old pump was a West Marine wash down pump. . . .it was mounted in with the oil tank. I ditched that and went with the Rule Livewell pump instead. ....better for my application of keeping bait alive and still able to wet the deck to clean. ...I also used some 4200 to secure a Forespar (plastic) scoop to the hull. . ..but don't think I snapped a pic. ..
. .. . . ..so hope maybe someone can get something out of this. I will be posting a few more in the days to come.
Thanks for reading