Leaking and knocking.

Classic Parker Boat Forum

Help Support Classic Parker Boat Forum:

This site may earn a commission from merchant affiliate links, including eBay, Amazon, and others.

Sleigher

Well-known member
Joined
Sep 30, 2008
Messages
67
Reaction score
0
Location
Los Angeles, CA
Hi All,
I sent this to Eric at Parker but I haven't heard back yet. If anybody can help with their ideas I would appreciate it immensely.
Peter

Hi Eric,
I searched the Classic Parker site for this and found that you had helped some owners with at least one of these problems.
I have a 94 2520 XL MV.
I have been working on the boat for three years now.
The previous owner neglected it but I was not aware how much so, until about a year ago when I realized that I probably hadn't got such a good deal.
Anyhow, I took it out for the first fishing trip on the West Coast (I bought it in Florida) this last Saturday.
Two problems that I hope you can help with are:
Water leaking into the cabin from the screw holes of the rub-rail. Some of the screws look to be self tapping and some are thru-bolted. Is this from the factory this way or is this likely a repair?
Can you detail the repair for the leak? I have an idea how I would do it but any help would be appreciated. The rub-rail is the black plastic variety. Looks to have a black channel with a black insert.

I have a knocking sound coming from the console (sounds like it is coming from right under the shift/throttle) when going over bumps. I'm thinking that it might be related to the screws holding the cap (those under the rub-rail) because I can't find anything loose behind the console.
When bouncing it is pretty predictable but you can't reach underneath and stop it.
I'm wondering if it could be the pilot house shifting just a little bit.
When you walk up along side the pilot house after the boat has been sitting (on the trailer) you will hear a loud pop but only once. Like cracking a knuckle.

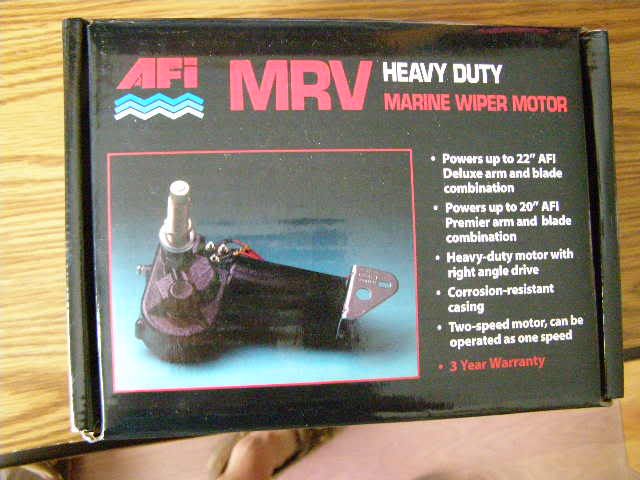
One more thing, while I have your attention, can you tell me the make and model of the windshield wiper motor? It did work but it's not working now and I clearly need it.

Thanks in advance,
 
Can't help with the knocking but I can answer your rub rail question. The cap of the boat is through bolted with lock nuts every 6" to the hull. There is a bead of white silicon or 4200 under the edge that seals water out. The rub rail without the round insert is screwed onto the edge with the bottom lip pushed up to the joint you just sealed. It is screwed in with 1 1/4" screws between the through bolts. The rub rail does not have any nuts. Next put the round insert back in the groove.
 
The leak is an easy fix.
Pull the boat
Scrape out any caulk from the cap joint that you can get out. You don't have to get it all out.
Tape off the top and bottom of the joint all the way around the hull.
Fill with 4200 and smooth it out.

I did this two years ago and stopped the leaks. So far so good
 
I did the same thing on my 2530 this year with the leak, seems all Parker PH's have that leak or will develop it, fix is same as above but use 5200 for a more permanent fix, unless you plan on taking the cap off someday. :D
 
Personally I'd use LifeCaulk by BoatSeal instead of any 3M product. While I do use 3M 5200 for below the waterline only situations, I have found LC to be a superior product for all-around use where a tenacious bonding sealant is required. The tubes also last seasons, unlike those from 3M which harden.
 
windknotnc":6411o591 said:
Can't help with the knocking but I can answer your rub rail question. The cap of the boat is through bolted with lock nuts every 6" to the hull. There is a bead of white silicon or 4200 under the edge that seals water out. The rub rail without the round insert is screwed onto the edge with the bottom lip pushed up to the joint you just sealed. It is screwed in with 1 1/4" screws between the through bolts. The rub rail does not have any nuts. Next put the round insert back in the groove.


That is absolutely one of the best explanations I've read on how to correct a cap seal issue. 8)
Thanks Windknotnc!
 
Thank you for the replies.
The leak is very clearly coming in through the screw holes.
If I read this correctly, some of you are saying that you caulked the bottom of the rub rail without removing anything?
Isn't it likely that water can get behind the insert and continue to leak?
I don't want to make this harder than it is but I would prefer to do it one time.

Thanks again.

Peter
 
I caulked the bottom and took out every screw in the area and even put a dab on top of the bolt heads.

The rubrail hides it all so I went for the seal rather than making it pretty.
 
Sleigher":fv4jwu6c said:
The leak is very clearly coming in through the screw holes. If I read this correctly, some of you are saying that you caulked the bottom of the rub rail without removing anything? Isn't it likely that water can get behind the insert and continue to leak?
Water from below is being FORCED into the hull under the pressure of the boat hitting a wave or wake.

Water getting in behind the rubrail from above is likely rainwater only. I can see that 'weeping' a tiny bit, but not more than that. I'd put a small seam 1/8" or less of black 'goop' from a tiny nozzle on the top of the rubrail, then would cut the nozzle tip bigger and would put a larger bead on the bottom.

Then another year, on a warm day with constant, but NOT to exceed ~75-degrees or so, you could remove that center piece insert, bed the screws/bolts behind it properly and re-install. If the temps are TOO warm out ... that center insert will grow in length ... so you'd be best advised to remove/install when temps are constant. Also put a witness mark in a few places around the hull to put it back envenly. NOTE however, you may very well need a hair dryer or heat gun set on low to heat up the rubrail (NOT the insert!) to allow the insert to go back in more easily that it otherwise may.
 
Does the wiper motor look like this? I added a port wiper to my 1999 2520.
It's an AFI 80 degree sweep, 2 1/2 inch shaft.

P6170002.jpg
 
DaleH":2kgzr5ax said:
Personally I'd use LifeCaulk by BoatSeal instead of any 3M product. While I do use 3M 5200 for below the waterline only situations, I have found LC to be a superior product for all-around use where a tenacious bonding sealant is required. The tubes also last seasons, unlike those from 3M which harden.
I 2nd the LifeCaulk! Got turned onto it about 3 yrs ago and it is way better then 3M! Good Luck with your project.
 
Thanks again.
Yes, I have been using the Life Caulk or Boatlife for a long time.
It also comes in black which I found out by buying the wrong tube.
So, that might work out for around the rail.

P
 
I like to provide closure. Not near as much as I like to achieve closure but I always appreciate when someone has asked for help with a technical problem and then let us know how it turned out. AHEM.
Anyhow here is some closure.
The knocking sound was being caused by a piece of wood trim that was a hair too long. The PO had installed this wood in the cabin. If you look just starboard and forward of the shift mechanism you can see the trim. Apparently they wedged it into place. Very common in carpentry and framing to make a piece of wood fit with a hammer.
I removed the trim and heard a similar noise. It was too good to be true.
Previously when you walked on the walkway next to the pilot house you could hear the pop. After pulling the trim that stopped. Took it out yesterday and went over swells and chop-no pop. All I had to do was trim the trim about a .25" and it was done.
As far as the leaking was concerned I did as was suggested and re-caulked under the rub rail. Seems like that took care of it.

Thanks again.

P
 

Attachments

  • wood in cabin.jpg
    wood in cabin.jpg
    141 KB · Views: 372
I had some damage to the rub rail this weekend. I was rafted up to my buddies boat and a very bad storm came in we did everything we could, but mother nature had her way. A few screws got bent and the rub rail was not damage. I backed out the screws filled the holes with clear caulking and put the new ones in. I did have to drill a new hole for one of the screws. once the rub rail was on I caulked the top and bottom of the rub rail. Once you caulk it all in no water should come in.
 

Attachments

  • photo 1.JPG
    photo 1.JPG
    28.4 KB · Views: 245
  • photo 2.JPG
    photo 2.JPG
    21.3 KB · Views: 245
  • photo 3.JPG
    photo 3.JPG
    24.3 KB · Views: 245
  • photo 4.JPG
    photo 4.JPG
    41.6 KB · Views: 245
Back
Top