The 12x18 trimtab upgrade Dale finally convinced me to do

Classic Parker Boat Forum

Help Support Classic Parker Boat Forum:

This site may earn a commission from merchant affiliate links, including eBay, Amazon, and others.

rloomis

Well-known member
Joined
Feb 12, 2008
Messages
85
Reaction score
4
Here's the result after changing out the factory 12x12 Lenco tabs for 12x18's

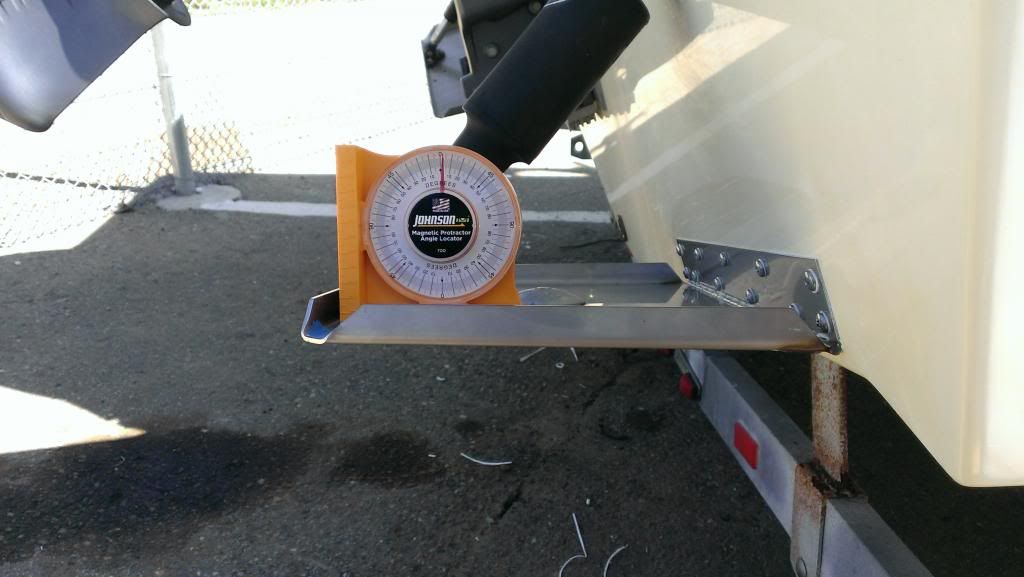
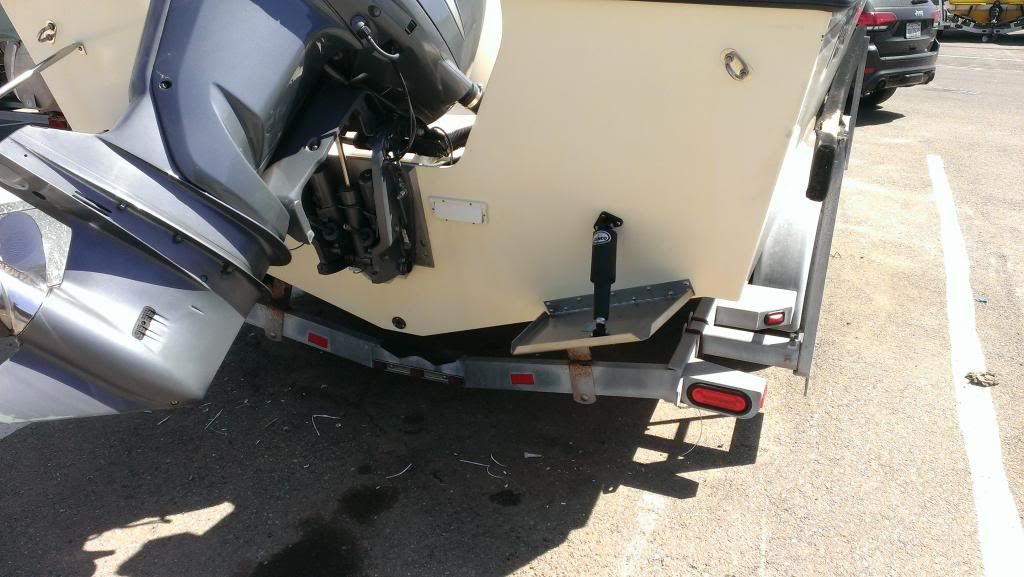
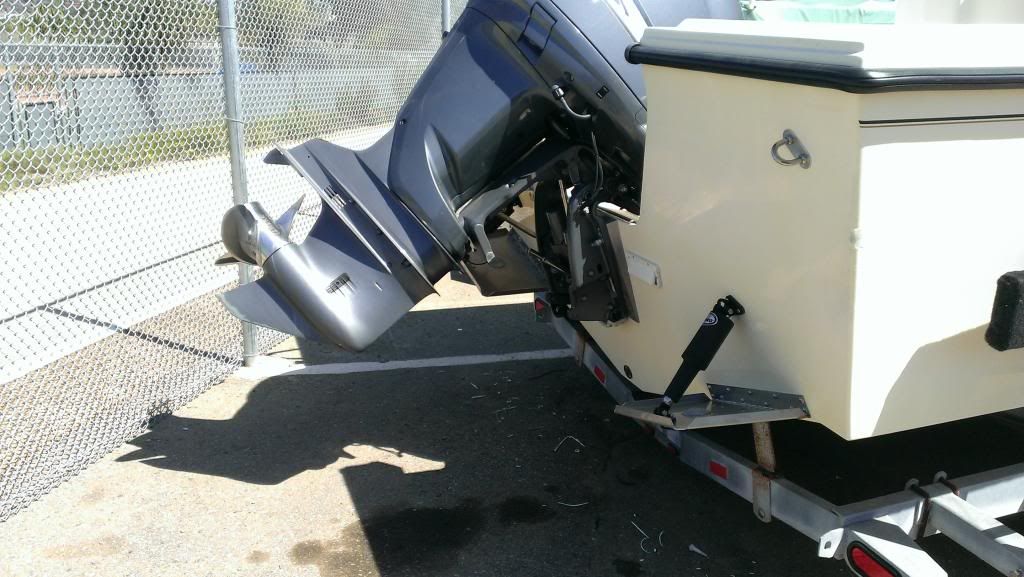
Full up position, reads 2degress from level - the boat is sitting bow high with trailer tongue jack raised
IMAG0271_zpsfe68d7cd.jpg


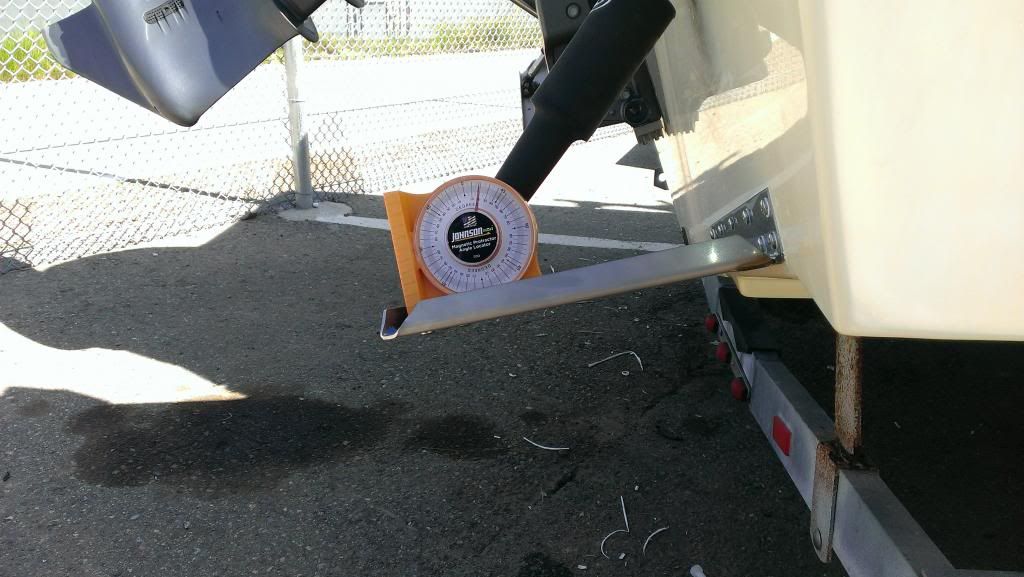
full down reads ~18 degreees, so I have a little over 15degrees total travel.
IMAG0270_zps895eff54.jpg


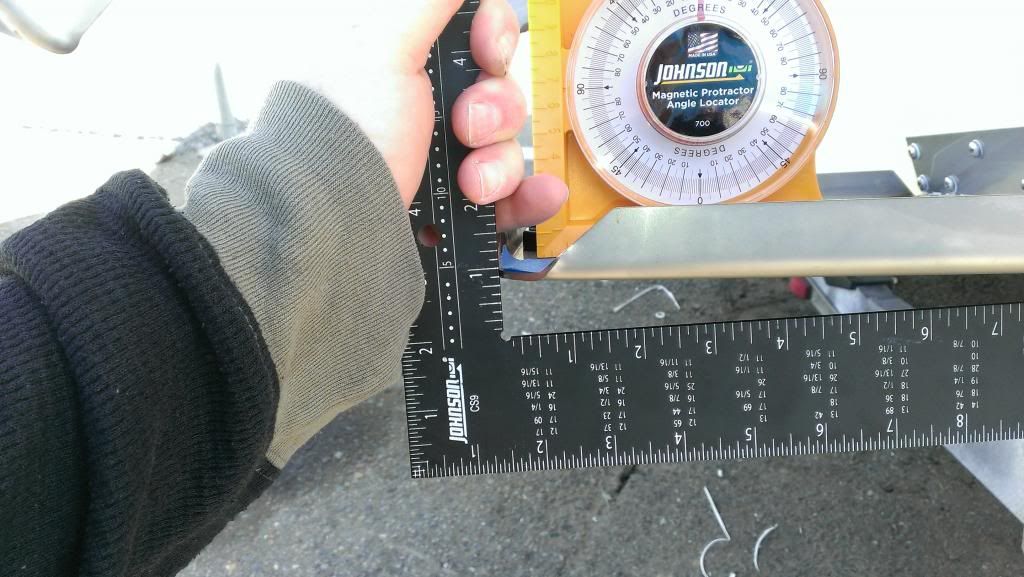
trailing edge is 7/8" above plane from bottom of hull. Since I didn't move the original position of
the actuators, the full up/down positions are same as I had with factory 12x12 tabs.
My boat always liked to have a touch of down-tab with the factory tabs. In slow travel into head-seas, I was
always looking for a little more down-tab. The new, wider blades should help give me more lift when deployed, but still wondering
if I could add a little shim to give me more usable range to the down-side. A 1/4" piece of starboard between
bottom of actuator and tab might dial in a full 20degreess downtab and I'd only lose a couple of degrees negative trim that
never really did me any good - even in heavy following seas. Will give a sea trial and see how she handles first...
(wondering now too if I had just added shims to the original 12x12's if that would have been "good enough" of an upgrade...)
IMAG0272_zps856876ce.jpg


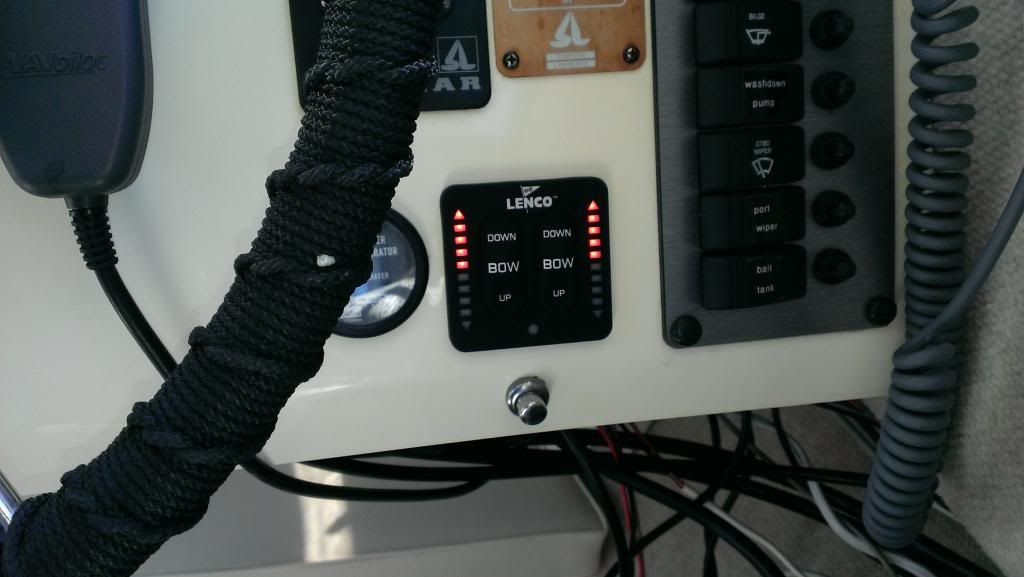
To get the new 12x18 tabs, I bought a new, full kit to also get the indicator switch upgrade. I have a spare set of actuators now.
IMAG0273_zpsaa15511b.jpg


rear view1
IMAG0276_zps7e54c2b1.jpg


rear view 2
IMAG0277_zps219e6f84.jpg


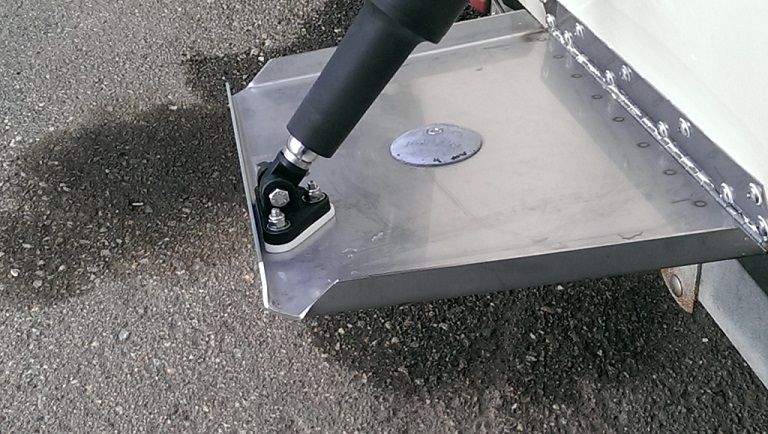
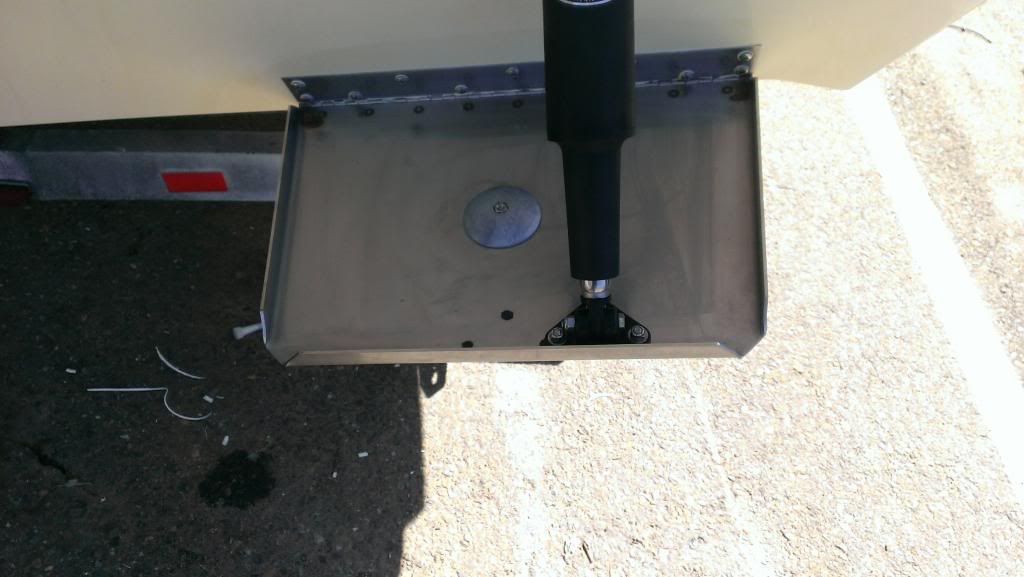
I did the "lazy lenco" upgrade option leaving the actuators in the original position. But needed
to drill new holes in the tab to bolt the actuators to the tab in an offset position. Original tab holes filled with JB weld, also added a zinc.
IMAG0278_zps5c188411.jpg
 
Do you think the force of water will have a affect on the tab not being centered? I am thinking about adding 12"x18" to my 23' but was going to use existing location or center them. I would be 1" in from edge of the outside edge of hull.
 
(wondering now too if I had just added shims to the original 12x12's if that would have been "good enough" of an upgrade...)


This is a good point ... :roll:
I know you would not have the same surface area but I wonder if there would be a noticeable difference?
Also dos anyone have an opinion on having the actuator not center cause problem's ?
I am also thinking about this upgrade..

Anyway they look good on there 8)
 
On any suez upgrade, I'd go wider as much as possible and would go even wider while trying yo get from 12" off the hull to 9" depth. Remember, width gives performance without sacrificing efficiency. 12" deep tabs ROB fuel economy ...

WAJSKI":1endffyr said:
Do you think the force of water will have a affect on the tab not being centered? I am thinking about adding 12"x18" to my 23' but was going to use existing location or center them. I would be 1" in from edge of the outside edge of hull.
If you have a reverse chine on the outside last few (3-4") inches of the hull where it slopes down ... I would NOT go so far out.
 
The actuator being off-center looks a little dicey. You'll find out soon enough if its a problem. If it is, you might consider installing a ss or alum. pad under the actuator toward the center of the tab to stiffen it up a bit.
 
I personally don't see an offset actuator as an issue to lose sleep over. I'd just use SS rivets to secure an 'L' shaped stiffener to the tab where the actuator mounts. Use all SS hardware and fasteners to avoid galvanic corrosion due to dissimiliar metals.
 
TWOBOATER":pt2mupst said:
The actuator being off-center looks a little dicey. You'll find out soon enough if its a problem. If it is, you might consider installing a ss or alum. pad under the actuator toward the center of the tab to stiffen it up a bit.

The tabs are 1/8" SS and don't appear to flex much so I think it'll be ok as is. If I find out otherwise, I'll probably do something like you describe to both bolster the offset area and provide a small amount of shim to adjust the tab range downward a bit (not with alum. tho). I don't think I'll regret this upgrade instead of just shimming the original 12x12's. The broader tabs will hopefully give me better low speed planing efficiency which was the main motivation for doing anything at all. I'll post some data soon as I get a chance to sea trial.

A couple other things I noticed when doing this install:

The range of deflection travel is not very much, less than 20degrees. A small difference where the actuators and bottom edge of the tabs are mounted will make a pretty big difference in the range of tab deflection you will get. I don't know what kind of tolerance the Parker factory keeps when measuring from bottom of hull to bottom of tab and to actuator transom mount point. But less than 1/4" overall variance could result in 10%-20% or more difference in tab deflection range.

Since I drilled new holes in my tabs, if I had to do it over, I'd drill the new holes slightly forward of the edge which would make the full up position slightly lower and also give me a little more angular range of travel. I might still install a 1/8" - 1/4" shim between actuator bottom and tab to shift the range of travel I currently have slightly to the down-side. I just want to be careful not to underestimate how much negative angle I really need in the full up position to keep the install safe.

I also noticed when I removed the original tabs that Parker used VERY LITTLE caulking material between tab and transom and there appeared to be none used to coat the screws. The original tabs popped off pretty easily, maybe because there was so little caulk used, but I'm doubting it was 5200. For my new install I used a liberal amount of 4200 with the thought being: never say never need to remove/replace these again. 4200 is still very strong and stays more pliable than 5200, so is much easier to work with for trimming off a clean edge after it sets. Hopefully I won't regret not going "maximum strength" adhesive. But if I find out later it wasn't strong enough, I can still remove them and re-bed with 5200.

When I re-drilled the original holes to give a fresh surface for epoxy filler, the wood shavings from the 3 outermost screw holes on stbd side were darkened from dampness. Even if you're happy with the factory size tabs, you might still want to remove your tabs, redrill the holes oversized, coat with epoxy, then drill right-size and use a more thorough application of adhesive caulk that includes coating the screws.
 
rloomis

Thanks for all your info!
Keep us up on the sea trial
Really got me thinking about how my factor screws are set
Another reason to do the upgrade
Has anyone else seen inadequate seal on the factory install?
 
Rloomis

Thanks for the pics and great info. I've also been thinking about doing this and wondered about not moving the actuators as I've heard from others here. These are the best pics of how it looks when done that I've seen. Makes me feel better about trying it. Probably going to be next year for me though as I'm doing other projects this year. I also want to do the new trim switch with the LED's. How much and from where did you find the 12x18 tabs? When I have looked it seemed almost as cheap to get the set with actuators included. Looking forward to hearing how sea trials go. Hope you post results.
Good luck!
 
This is what I found ...

http://www.marinedeal.com/product_p/29317.htm

I was thinking of changing out the actuators too just for G.P. there 11 yrs old now
I figure Ill have a couple of spares
Anyone find cheaper??

Also I was thinking of adding Auto Glide
I was thinking it would give me a more controlled ride when I'm by myself or walking around boat underway
Make the boat seem more beemie with the Auto correction on

http://www.youtube.com/watch?v=vD80u9WVSks

http://www.discountmarinesupplies.com/L ... _Kits.html
 
Got mine online from BOE Marine for $739 (Lenco 12x18 edge mount kit w/ LED switch)
Wanted to do the LED switch upgrade while I was at it and trying to buy only the tab blades while also wanting
a new LED switch separately didn't make much cost sense over just getting a new full kit.

The original trim tabs, prop, helm chair, non-LED nav lights, anchor roller.....
At the rate I'm going, in about 10 years I figure I'll have swapped out enough spare parts to build me a 2nd Parker :D
 
I'm kicking myself now as when I purchased my 2120 in Nov and tabs were frozen and not operating. So that was the very first thing that I fixed. I ordered 2 new Lenco Actuators for about $250 on-line. Of course at that point I had only had it in the water 1 time and had not had enough time with it to realize that I felt the tabs were too small. I believe DaleH clued me in on the concept as well. Maybe I'll buy the set and post on here the actuators for $225?
 
After sea trial, I ended up adding 1/4" shims fab'd from 1/4" starboard into shape of the actuator mounting footprint and mounted using 1/4" longer bolts. The Lenco recommendation is trailing edge of tab should be 3/4" above the plane along the bottom of hull. Using the Parker factory actuator positions, my tabs were 7/8" above. I think the Lenco lawyers added negative trim recommendation to the install, then the Parker lawyers gave it another 1/8" just to be really sure.
Seeing as how it might be dangerous and all if a tab were to effectively direct the bow downward... :roll:

The wider 18" tabs combined with the shims shifting the adjustment range downward, I'm getting improved results.
(Also with the prior addition of the transom wedge to give more negative engine trim.)

Low speed planing is much more manageable now and getting better mileage at low speeds into choppy headseas.
Slowing down to around 12-14kts into headseas formerly resulted in badly plowing and getting 0.9 - 1.1 MPG. Now, I'm able to run at these speeds "semi-planing" into chop and getting 1.9MPG or better.
I think the 2120 is a little challenged with the weight of a 225 4stroke on the back and these tweaks have
gotten it working fairly well now.

trim_tab_shim_zpsea0c01a4.jpg
 
Rloomis... Thanks again for your great pics and info. I may be following in your footsteps later and this gives me a great reference. I'm chasing the same goals of better slow speed planing in head seas etc... with the same F225.
Great job with yours and good luck. I hope you don't mind me reaching out when/if I get around to this project.
 
Back
Top