thru hull fittings

Classic Parker Boat Forum

Help Support Classic Parker Boat Forum:

This site may earn a commission from merchant affiliate links, including eBay, Amazon, and others.

rpeconic

Member
Joined
Nov 11, 2010
Messages
8
Reaction score
0
Location
great south bay, peconic bay
I want to replace the thru hull fittings on my 2003 2520xl. The shrink wrap is in place and I can"t remove them. Are the stern thru hulls 1" or 1 1/8. I think the forward bilge pump is 3/4. Thanks again in advance. I am so sick of winter. Ready to put the boat back in but there is a foot of ice on the creek and 2 more storms are forecast for this week.
 
Look at the bilge pumps. Up to and including a 800GPH has a 3/4in barb. Above that and it's 1 1/8in.

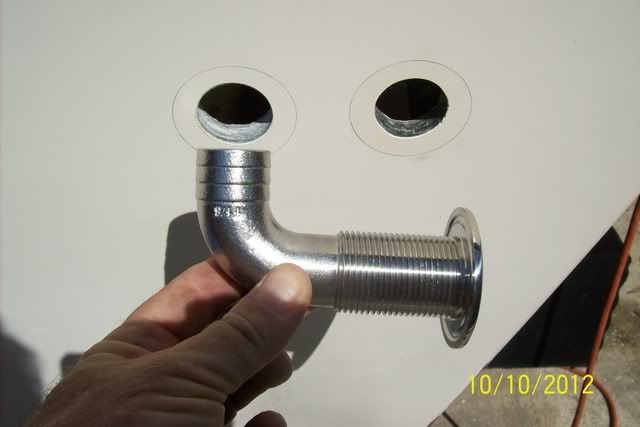
For the rears....I highly suggest these. 316 Series Stainless.

100_4132.jpg


http://www.replacementboatparts.com/sta ... 8hose.aspx


You point the barb UP, which helps in creating a loop.
 
rpeconic":1ff3xcj9 said:
I want to replace the thru hull fittings on my 2003 2520xl. The shrink wrap is in place and I can"t remove them.
Don't guess ... but measure right and once. Besides, Kevin's is a late '90s model and may not be the same as yours. And pump outflow is not a reliable indicator of the fitting used.

There's stir crazy ... and then there's jut plain crazy ...
 
If yours are the plastic through-hull fittings, they will likely disintegrate when you remove them.
Those things degrade in sunlight. :(

Bobby is correct about pump size and fitting size, but you might want to verify what you have, just in case someone replaced those pumps with a different size.
My replacement fittings are chrome over bronze, but those stainless fittings Bobby shows in his photo are very nice.
As I recall, you do need to be careful as there is a difference in OD size between the stainless and bronze parts so measure what you have.

When I replaced my fittings, I also replaced my bilge pumps and the discharge hose at the same time.

Primary rear bilge pump is a 1500 gph Rule with a second 1500 gph Rule as a backup.
"Float switches" are electronic Water Witch Model 101, with the switches set to activate at different levels.
https://www.waterwitchinc.com/new/SiteE ... tches.html
The discharge hose looks 'ribbed' in the photo, but it is actually smooth inside (for better flow) with a stiffening helix around the outside.
All hose clamps were upgraded to stainless AWAB clamps.

The forward pump was upgraded to an 800 gph Rule with the same discharge hose and float switch.

As Bobby mentioned, make sure that you incorporate a weather loop into your discharge hoses, especially the forward one, as that fitting is very close to the water line.
Hope this helps!
 

Attachments

  • bilge pumps.jpg
    bilge pumps.jpg
    973.5 KB · Views: 654
Yes like Kevin said get rid of the plastic fittings, anyone who has them should replace, I replaced all of mine last year after discovering that the one that drains the in deck fish box was cracked, if this had let go it would have sank my boat. As soon as I applied pressure to the backing nut this is what happened. The forward bilge fitting was also cracked and was taking on water when the starboard side of the bow would dip below the water line, i noticed this by finding water in the hatch under my V berth.
Replace them with stainless ASAP, plus they look a hell of a lot better then those cheap plastic fittings.
 

Attachments

  • through hull.JPG
    through hull.JPG
    142.1 KB · Views: 635
  • through hull 2.jpg
    through hull 2.jpg
    133 KB · Views: 635
I used the Chrome over Bronze in my Mako. It tarnished. I understand that Stiger used Chrome over Bronze for above the waterline. But they switched to Stainless after so many warranty jobs where people were displeased.

Don't settle for 304 Stainless. Be sure to get the 316L stainless. The 304 will rust and or have rust stains running down the hull.
 
The best stuff comes from Marcus @ GemLux,
be sure and check out the new "Yacht Wheel"
Marcus is the man.

We just launched our new website. It has good information about our cast thru hulls versus our new forged line of thru hulls. Check it out if you get a chance. www.gemlux.com
Marcus Perry
Key Account Manager
[email protected]
www.gemlux.com 800.874.4506 Tel
904.269.5905 Fax
140 Industrial Loop
 
My spring project this year is to swap out the thru hulls on my 2110. Would like to find a solution to the thru hull for the ice box/fish box that sits right at the water line. It's currently set up (and I think it's a factory set-up) with a Perco rubber flap scupper like this

58361.jpg


which makes it protrude probably 3/4" from the hull. Wish I cold find something that served the purpose of limiting backwash, but sat flatter and looked better. Though truthfully, I'm not sure how effective that Perco is since it always seems to be collapsed into the hole.
 
I have a 2001, 1801 with the flip back seat/livewell combo. I have replaced my thruhulls with gemlux stainless(I have two for bilge pumps), but the live well thru hulls on the transom look different from a regular one. Any ideas or suggestions on replacing them?
 
Megabyte":33psuoh8 said:
If yours are the plastic through-hull fittings, they will likely disintegrate when you remove them.
Those things degrade in sunlight. :(

Bobby is correct about pump size and fitting size, but you might want to verify what you have, just in case someone replaced those pumps with a different size.
My replacement fittings are chrome over bronze, but those stainless fittings Bobby shows in his photo are very nice.
As I recall, you do need to be careful as there is a difference in OD size between the stainless and bronze parts so measure what you have.

When I replaced my fittings, I also replaced my bilge pumps and the discharge hose at the same time.

Primary rear bilge pump is a 1500 gph Rule with a second 1500 gph Rule as a backup.
"Float switches" are electronic Water Witch Model 101, with the switches set to activate at different levels.
https://www.waterwitchinc.com/new/SiteE ... tches.html
The discharge hose looks 'ribbed' in the photo, but it is actually smooth inside (for better flow) with a stiffening helix around the outside.
All hose clamps were upgraded to stainless AWAB clamps.

The forward pump was upgraded to an 800 gph Rule with the same discharge hose and float switch.

As Bobby mentioned, make sure that you incorporate a weather loop into your discharge hoses, especially the forward one, as that fitting is very close to the water line.
Hope this helps!

Sorry to high jack the thread :cry:
I'm newly registered to Classic Parker but have been looking and reading for several years since buying my Parker. I just want to say thanks to all members for there post as they have been a blessing.

My question for Kevin (Megabyte) is I'm struggling with my project of a seacock valve installation. I noticed in the above picture that your valve is nethier bolted or has a support block under it, was that install from parker or aftermarket install? I'm trying to install one but didn't know if a block is nessasary. My bilge area looks to be just like yours.
 
firemans15":347ceoyq said:
My question for Kevin (Megabyte) is I'm struggling with my project of a seacock valve installation. I noticed in the above picture that your valve is nethier bolted or has a support block under it, was that install from parker or aftermarket install? I'm trying to install one but didn't know if a block is nessasary. My bilge area looks to be just like yours.

What you see there is the factory install.
If you would like to see a seacock installation, read through Warthog5's threads where he details how he did his.

Honestly, I can't remember the last time I used my wash down, so that valve stays closed unless, or until I do.
I'm a bucket kind of guy. :)
 
Back
Top